DIY Instructions
“Gracefully crafted, timelessly Texan.”
Welcome, friends! We’re delighted you've chosen to craft your own heirloom style homecoming mum. At Southern Belle Mums, we believe each creation should be as elegant and memorable as the young lady (or gentleman) who wears it.
Before you begin, we kindly suggest reading through these instructions in full and check out our DIY Mum & Garter video. Understanding the flow of the process will help ensure a smooth and graceful experience.
Ribbon Reference Guide
You’ll see references to ribbon sizes throughout these instructions. Here’s a guide to help you select your materials with confidence:
-
#3 Ribbon – 3/8” wide (ideal for delicate accents and petite bows)
-
#5 Ribbon – 7/8” wide (excellent for layered detailing)
-
#9 Ribbon – 1.25” wide (a versatile middleweight option)
-
#16 Ribbon – 2” wide (your primary ribbon for bold, beautiful statements)
-
#40 Ribbon - 2.5" wide (foundation ribbon for body of the mum)
Step 1: The Unboxing
This can be the most exciting part of the whole DIY mum process! Opening up your box and finding all of the beautiful ribbons, colorful trinkets, and breathtaking accessories. This is the best time to set out each of the items needed in the steps below. Let's go through them now!
-
Put together all the backer ribbons by size with the base backer.
-
Pull together the 10 prepped homecoming loops, letters, and #16 ribbon (light).
-
Find a #16 (light) and #9 (dark or red) ribbon and place with your name letters.
-
Layout your braid and imprint ribbons together.
-
Gather the Crown backer, and the prepped loops (6) and points (6).
-
Group together the flower, neck ribbon, and finishing backer.
Now you are reading to start building your mum!
Step 2: Adding Names and “Homecoming” Loops
Including names and Homecoming loops are a lovely way to personalize your mum. This element adds an elegant vertical features, classic and refined.
Materials:
-
Use a strip each of #16 (primary) and #9 (dark) ribbon
-
Place Name(s) on the #9 ribbon (make sure to leave space at the top to attach to the base later.
*Styling Tip: Use a darker color for your #9 ribbon to apply glitter lettering, it allows the text to shimmer with greater clarity.
-
Use 10-6” pair of ribbons (or 10-5" for the Beau Garters) and place each letter about 1" (3/4" for Beau) from the top.
-
Fold each grouping into a loop and fasten with a staple at the base. You will have 10 loops.
-
Staple each loop to a strip of #16 ribbon (light), starting at the bottom, overlapping slightly to conceal staples.
-
Leave space at the top to attach it to the base later.
Set aside until assembly.
Step 3: Assembling the Base
With all of your mum ribbons sorted and assembled, it’s time to construct the body of your mum.
-
Begin by attaching streamers to the base backer.
-
Start with the widest ribbons along the outer edges.
-
Gradually layer inward for a full, polished look.
-
-
Add the imprint ribbons, your name, homecoming loop, and braid.
At this stage, you may also add additional ribbon, braids, feather boas, or garlands that you have.
For Garters:
-
Place the garter around the ribbon backer.
-
Staple the middle of the garter to the middle of the backer.
-
Stretch the garter to each edge of the backer and staple into place.
-
Add a few more staples across the top of the garter and backer.
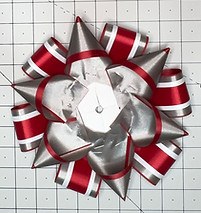
Step 4: Preparing the Crown
We begin with the backer, which serves as the elegant base for your design. You may choose to style your backer with Loops and Points or a series of Double Loops, both are timeless options.
In the example, we’ve created layered loops using #16, #9, and #5. The ribbon lengths are 6" each.
-
Fold each grouping into a loop and fasten with a staple at the base. You will have 6 loops.
To attach the loops:
-
Begin by centering your first loop at the top of the backer, aligning with the center hole.
-
Place a second loop directly opposite, then repeat this left and right.
-
Continue filling in the remaining spaces, forming a symmetrical circle.
For the second layer of points:
-
Use 6” strips of ribbon (we’ve chosen #16 and #9).
-
Fold each into a point and staple at the base.
-
Make 6, placing them evenly between your original loops.
Step 5: Attaching the Mum Top
Now, let’s bring it all together.
-
Apply hot glue generously to the streamer base.
-
Carefully align your mum top (with loops and points) over the base.
-
Press gently but firmly to secure in place, ensuring the central holes remain open.
Neck Ribbon:
-
Cut the neck ribbon in half.
-
Staple one end to the upper left, and one to the upper right of your crown backer.
-
These can be tied to fit comfortably around the neck or shoulder.
-
To seal satin ribbon ends: Briefly pass a flame along the edge to prevent fraying, just a quick flick!
Garter Band Tip:
-
Make sure not to staple the outside of the garter when attaching the mum crown to the backer.
Step 6: Securing the Flower
With elegance in every detail, it’s time to anchor the flower.
-
Apply hot glue to the top Crown backer.
-
Thread the pipe cleaner from the flower through the center holes.
-
Pull snug, hold in place, and allow the glue to cool.
-
Flip your mum over and glue a clean backer to conceal any visible staples or materials.
Step 7: Final Embellishments
Now comes the most delightful part: the finishing touches.
-
Decide where to place your trinkets and embellishments.
Ideas for styling:
-
Tie curling ribbon into delicate bows and attach to honeycomb or solid streamers.
-
Add small glitter cardstock shapes behind trinkets for added dimension.
-
Secure jingle bells with curling ribbon or feed a pull bow through a cowbell for a refined focal point.
-
Add glitter, charms, or stickers to personalize your creation.
-
Decorate the top with flair — but remember, a touch of restraint ensures the elegance of your design shines through.
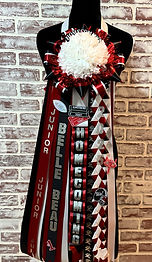
Congratulations, Belle or Beau!
You’ve completed your handcrafted mum or garter, a graceful symbol of Texas tradition and Southern celebration. Whether you're wearing it yourself or gifting it to someone dear, know that you’ve created something beautiful and meaningful.
We’d be honored to see your final design! Send us your
photos or share your experience at
From our family to yours,
Thank you for choosing Southern Belle Mums!